Moodle App Development Guide
This document contains information that developers should know before starting to code on the Mobile App. If you are only interested in developing a site plugin, you should read the Moodle App Plugins development guide instead.
Please notice that this documentation is useful to develop code that will be integrated in the standard app or in a custom app. Developers that want to add mobile support to their Moodle plugins don't need to follow this.
Before embarking on Moodle-specific documentation, we recommend that you are at least familiar with Angular and Ionic Framework, the core technologies used in the application. We'll reference any relevant concepts, but having a basic understanding will take you a long way in understanding the Moodle App.
Setting up your development environment
In order to get started, you'll need to prepare your development environment. We recommend that you do it before proceeding with the guide, that way you can tinker with the codebase to solidify your understanding.
You can obtain a copy of the source code by cloning the public repository. If you want to work on a specific version of the app, you can check the tag with the version number you need; for example v3.9.5. If you want to work on the latest development version, you should check out the main branch:
git clone git@github.com:moodlehq/moodleapp.git
cd moodleapp
git checkout main # or `git checkout v3.9.5`
The only things you need to install before running the app are NodeJS and npm. Make sure that you are using the correct versions of each environment (looking at the engines entry in package.json). We recommend using a version manager like nvm to make this easier, you can prepare the correct environment running nvm install in the project root. Remember to run this every time you work with the app, or if you're not working on any other node projects in your computer you can run nvm alias default `node -v` to make it the default.
Once you have the correct environment set up, you can run the application with the following two commands:
npm install
npm start
This will launch the application in a browser, but keep in mind that it only works with chromium-based browsers. You can read more about that in the Using the Moodle App in a browser page.
Other than this, there are different things you'll need to do depending on what you are trying to achieve. We'll go over some of them briefly, but if you want to learn more about this or something isn't working as you expect, make sure to check out the full guide on Setting up your development environment for the Moodle App.
Editing code
You can use your favorite editor to work on the application.
We recommend using VSCode as it is the one used by the core team and the repository is configured with some specific settings for the Moodle App.
The code follows the Moodle App Coding Style, and many of the style rules are enforced with ESLint. If you are using VSCode, you can automatically lint your files using the ESLint extension.
Debugging
While working on the app, you'll want to debug what's going on under the hood. The application uses a logging mechanism to inform of what's happening, so if you open the console during development you will see a bunch of messages that you may find useful.
If you are working on something related with the user interface, it is useful to inspect the state of the Angular components in the page. You can do that using the Angular State Inspection browser extension.
If you are working on something that is pure logic (although it can involve components), you may want to give unit testing a try. If you are using VSCode to run the tests, you can use breakpoints right on your editor. If you are struggling to reproduce an issue in tests, you can also use breakpoints in the browser using the Sources Panel.
If you need to debug how the application is interacting with a Moodle site, you'll need to take a look at the network requests. Most of the time using the Network Panel should suffice, but if that isn't working take a look at the Debugging network requests in the Moodle App page.
Working with a Moodle site
When you are using the app, you'll need to connect with a Moodle site. You may already have your own site, but using a real site may not be the best choice for development.
If you're working on something that doesn't need anything specific from your site, you can use a test site like school.moodledemo.net. This is a site that will reset all the data every hour, so you don't have to worry about making any persistent change by mistake. You can also use a shortcut to log in as a student or teacher using student or teacher instead of a url. However, keep in mind that this site is also used by others who are new to Moodle, so be sensible and don't abuse it.
If you need to configure something from the site, your best option is to run a Moodle site on your computer. Setting that up is outside the scope of this document, but we recommend using moodle-docker because it comes with everything you need (and it also supports running the app!). If you need anything specific from a course, you can always replicate it on your local site using the backup and restore functionality. You can create a backup from your production site, and restore it in your local site.
Working on native functionality
Most of the time, we recommend that you develop using a browser because it's faster and easier to work with. However, sometimes you may need native functionality that is only available on a mobile device.
You can learn how to set up your environment by reading Ionic's documentation for Android and iOS. The Moodle App also comes with some npm scripts used for native development. You can build and launch the app by calling npm run dev:android and npm run dev:ios.
Folders structure
In this section, we'll see how files and folders are organised within the src/ folder.
index.html
This html file contains the shell where the application will be rendered. Before the app is ready, even before JavaScript is loaded, this is what the application will look like. In a mobile device, users will never see this because it is hidden by the splash screen until the application is ready. That's why there isn't any markup other than the root component that will be rendered by Angular.
You won't see any script files referenced here because those are injected later in the compilation process. You can see the actual file in the www/ folder after running the build script.
main.ts
This file is the main entry point of the application, the first code that runs when the application is launched. The application is bootstrapped by Angular using our root application module.
You can learn more about this in the Application Lifecycle section.
polyfills.ts
This file adds polyfills for missing functionality in the platform.
app/
This folder contains the root component and the root module of the application.
You will notice that the app.module.ts file is quite small. This is because it only includes Angular and Ionic boilerplate, leaving the heavy lifting to the code within core/ and addons/.
core/
This folder contains the basic functionality of the application, and exposes pluginable interfaces for other parts to hook into. Anything defined here can be imported anywhere since it's critical for the app and it is available everywhere (in contrast to code within addons/). In order to identify code from this folder, all classes start with the Core prefix.
The core.module.ts file defines a module that imports all the core providers and modules. It encapsulates the initialisation of the application core.
The shared.module.ts file defines a Shared Module that exposes core declarables (components, directives and pipes). When other modules use any of these, it's preferable to import this module instead of individual declarable modules separately.
There is also a constants.ts file which should follow the conventions for constants files.
core/initializers/
This folder contains a collection of scripts that are run within the Angular initialisation process.
These files are automatically loaded using webpack, so it isn't necessary to import them anywhere. You can see how they are loaded in src/core/initializers/index.ts.
Keep in mind that any code placed here will delay the application startup, so it's critical that only the essential processes are included here. If something can be initialised lazily, it should.
core/services/
This folder contains Angular services available anywhere in the application.
Most of them are Singleton Services, and they can be accessed statically using their corresponding Service Singleton.
Given that services are created on demand, none of them is guaranteed to be initialised when the application is ready. So anything that's essential for the application to run should be placed in an initializer instead. In case that the initialisation relies on a service, it can be accessed using its Service Singleton. One good example of this is the database initialisation, which is placed on an initializer but calls each service's initializeDatabase method.
And of course, service dependencies can be declared in the constructor to use Angular's built-in dependency management.
core/components/
This folder contains Angular components available anywhere in the application (but remember that they should be imported explicitly using CoreSharedModule). They are exposed to the shared module using their own module: CoreComponentsModule.
This folder also contains an animations.ts file with reusable Angular animations.
All components must be declared with tag selectors starting with their module namespace (core- in this case), and defined within a folder with their selector (without the namespace prefix). These component folders can contain the following files:
{component-name}.ts— Component class.{namespace}-{component-name}.html— Component template.{component-name}.scss— Component-scoped styles.
Additionally, auxiliary components that are only used locally can be defined in the same folder, starting with the name of their parent component. For example, looking at the core-recaptcha component we can find the following files:
recaptcha.ts— Recaptcha component class.core-recaptcha.html— Recaptcha component template.recaptcha-modal.ts— Auxiliary modal component class.core-recaptcha-modal.html— Auxiliary modal component template.
core/directives/ and core/pipes/
These folders contain Angular directives and Angular pipes available anywhere in the application (but remember that they should be imported explicitly using CoreSharedModule).
They are exposed to the shared module using their own modules: CoreDirectivesModule and CorePipesModule respectively.
core/guards/
This folder contains route guards used to control access to restricted routes.
Given that we are working with a mobile application, and not deploying to the web, users won't be able to access urls manually. But it is still important to have proper guards to prevent potential bugs and vulnerabilities.
core/classes/
This folder contains classes that don't fit into any other part of the application. We must be careful not to bloat this folder and turn it into a mess. There can be subfolders to group files with related functionality.
Think twice before adding anything here.
core/utils/
Same as core/classes/, but containing functional utilities instead of classes.
core/singletons/
This folder contains some core Singletons and the logic to make Service Singletons.
Other than Pure Singletons, there are also some third-party services exposed through Service Singletons. However, service Singletons for application services should be declared in the same file where the service is defined.
core/features/
This folder contains Domain Modules for core features. Each of those modules encapsulates the functionality for a given area. Even though they can rely on each other (because anything within core is globally accessible), it should be avoided to reduce coupling.
The features.module.ts file defines a module that imports all feature modules.
Each feature module will be different, some may only provide services while others define routing endpoints (or both). In any case, each feature is encapsulated into its own folder.
When a module needs to export something, it has a file in its root folder named {feature-name}.module.ts defining the main feature module.
If a module uses lazy loading, that will be declared within a different module defined in {feature-name}-lazy.module.ts, and the lazy routes are exposed through the main feature module. In this way, the knowledge of which routes are loaded lazily is encapsulated within each feature folder.
Sometimes, it's possible that a feature allows nested routes to be defined from other modules. For example, the mainmenu feature allows other modules to add extra tabs. In those situations, these features will also have a {feature-name}-routing.module.ts file.
You can learn more about the contents and motivation of these files in the Routing section.
In addition to these files, feature folders may contain the following:
{feature-name}.scss— Reusable styles for components defined in this module.classes/— Same as core/classes/.utils/— Same as core/utils/.components/— Same as core/components/ (with thecore-{feature-name}-namespace).directives/andpipes/— Same as core/directives/ and core/pipes/.lang.json— See Language files.constants.ts— See Constants files.services/— Same as core/services/.pages/— Page folders have the same structure as core/components/, but in addition they can declare modules if a page component is to be used in more than one module. Also, page components will declare their selectors starting withpage-.
In order to distinguish code from each feature, classes will be prefixed with the feature name. For example, the home page component declared in core/features/mainmenu/pages/home/home.ts is called CoreMainMenuHomePage.
addons/
This folder contains Domain Modules for additional features. Its structure is similar to core/features/, but the namespace is addon-{addon-name}- and addon modules are decoupled from core and each other. This means that any code within core shouldn't import anything from addons, and addons shouldn't import anything from each other.
This level of decoupling can be achieved using the Dependency Inversion Principle, which in this case is easier to apply using Angular's Dependency Injection framework. However, this theoretical nirvana has not been achieved in the current status of the codebase. And it's arguable whether it is desirable, given the cost of adhering strictly to this pattern.
For example, calendar blocks defined in the block addon import a provider declared in the calendar addon. This violates the dependency inversion principle, but it's a sensible decision to avoid complicating the code in excess.
The end goal is to make each addon as independent as possible, keeping practicality and simplicity in mind.
In order to distinguish code from each addon, classes will be prefixed with Addon + the addon name. For example, the private files page component declared in core/addons/privatefiles/pages/index/index.ts is called AddonPrivateFilesIndexPage.
types/
This folder contains global TypeScript declaration files.
testing/
This folder contains supporting code for writing tests, but does not contain any tests. To learn where tests are located, read the Test files section.
theme/
This folder contains general app style sheets. theme.scss is the one that will be included in the html, the rest will be imported by theme or children of this.
theme.scss— This is the main file and contains imports to the rest of the files and 3rd party styles.theme.light.scss— Includes the desired variables for the light color scheme.theme.dark.scss— Includes the desired variables for the dark color scheme.theme.custom.scss— Includes custom styles.theme.base.scss— Contains global styles, css rules that will apply across the app.globals.scss— Introduces scss functionality on the the styles and contains imports to:globals.custom.scss— Global custom scss variables.globals.variables.scss— Global scss variables.globals.mixins.scss— App customised mixins.globals.mixins.ionic.scss— Imported mixins from ionic.
format-text.scss— Contains format-text tag styles.
assets/
This folder contains source files that are not considered app code. This includes things like fonts, images, and json files; but also external libraries that couldn't be installed using npm (for example, h5p and mathjax).
An exception to this rule is js/iframe-treat-link.js, which is a file that can be considered app code but it is injected directly into iframes without a compilation step.
File names
As a rule of thumb, TypeScript files should be named after the class or interface they export. Given that it's discouraged to use default exports in Angular applications, it is not obvious what that is for each file. But in most cases it should be fairly easy to see. In situations where there isn't a single relevant export, like a file exporting multiple functions, you should use a name that properly reflects the nature of this grouping.
File names should use kebab case and not include namespaces nor type suffixes. For example, if there is a service declared within core/services/ called CoreFoobarService, its file name should be foobar.ts, not core-foobar-service.ts.
If a folder contains more than one type of TypeScript file, the type of file should be added as a suffix with a dot. For example, the app/ folder contains multiple types of classes and that's why the file declaring the root component is named app.component.ts. Most components elsewhere don't have the .component suffix. The exception to this rule are module and test files, which must always use the .module and .test suffix respectively.
Language files
All feature and addon folders can contain a lang.json file, as well as the core/ folder. The JSON file contains all translatable string keys with the current english text. During compilation, those files will be merged into one single file on assets/lang/en.json that will contain the cooked string keys (every key of those files will be prepended with the module prefix).
An automatic process will create the rest of the language files on the assets/lang/ folder based on the Moodle translation platform: AMOS.
In order to match existing Moodle language strings with the app strings the app contains a file on the scripts folder called langindex.json. This file contains an indexed array with the cooked string keys of the app, the value of every item is the module (file name) where to find the string in AMOS. If the value contains a slash '/' the text before the slash will correspond to the module (file name) and the text after will correspond to the string key on that file. If it does not contain a slash, the string key will be the last part of the cooked string key (splitting using dots .).
Constants files
All exported constants should be declared within a constants.ts file. The term "constant" in TypeScript can be somewhat misleading, given that it is often used with the const keyword. What we mean with "constants" is simple read-only values. Most of the time, these will be primitive values (string, number, boolean, etc.) or simple objects.
This may seem cumbersome at first, but it's very important in order to optimize Code Splitting. Which can seriously impact performance. Given the size of the codebase, including a file in a bundle that doesn't need it can result in a cascade effect that bloats chunk sizes significantly. And constants are usually used outside of a module (for example, using route segments or unique identifiers).
Additionally, because it's very likely that the content of these files ends up in the initial bundle of the application, they should seldom import anything (possibly with the exception of other constants).
Test files
Tests are found anywhere inside the src/ folder, and they will be run as long as they end with .test.ts. As a general rule, they are placed in a folder next to the module responsible for the code being tested. And they mirror the folder structure.
Here are some examples:
- The utils text service declared in
core/services/utils/text.tsis tested incore/services/tests/utils/text.test.ts. - The credentials page declared in
core/features/login/pages/credentials/credentials.tsis tested incore/features/login/tests/credentials.test.ts. The test file can be directly undertests/(instead oftests/pages/credentials/) because the page component is the only file that will be tested for this folder. So it would be unnecessary to have a folder with a single file. - The root app component declared in
app/app.component.tsis tested inapp/app.component.test.ts. The test file can live alongside the component because this module doesn't have any nested folders.
In addition to unit test files, there is also a folder at testing/ with setup and file utilities shared among all tests.
Learn more about unit tests in the Testing section.
Routing
All core features and addons can define their own routes, and we can do that in their main module. However, those are loaded when the application starts up, and that won't be desirable in most cases. We can use lazy loading to defer loading routes until they are necessary. To encapsulate lazy functionality, we can define a Routed Module named {feature-name}LazyModule. For example, the login core feature defines both a CoreLoginModule (for routes that are loaded when the application starts up) and a CoreLoginLazyModule (for routes that are loaded only when necessary).
Dynamic Routes
With the folders structure we're using, it is often the case where different core features or addons need to define routes depending on each other. For example, the mainmenu feature defines the layout and routes for the tabs that are always present at the bottom of the UI. But the home tab is defined in the home feature. In this scenario, it would be possible to just import the pages from the home module within the mainmenu, since both are core features and are allowed to know each other. But that approach can become messy, and what happens if an addon also needs to define a tab (like privatefiles)?
As described in the addons/ folder documentation, the answer to this situation is using the dependency inversion principle. Instead of the mainmenu depending on anything rendering a tab (home, privatefiles, etc.), we can make those depend on mainmenu. And we can do that using Angular's container.
In order to allow injecting routes from other modules, we create a separated Routing Module. This is the only situation where we'll have a dedicated module for routing. Any routes that are not meant to be injected can be defined directly on their main or lazy module.
It is often the case that modules using injected routes use a RouterOutlet. For that reason, injected routes can be defined either as children or siblings of the main route. The difference between those is that a child will be rendered within the outlet, whilst a sibling will replace the entire page. In order to make this distinction, routing modules accept either an array of routes to use as siblings or an object indicating both types of routes.
Finally, since these routes are defined dynamically, they cannot be imported statically when defining parent routes. They will need to be encapsulated on a builder function, taking an injector as an argument to resolve all the injected routes. You can see an example of this in the buildTabMainRoutes, and how it's used across the app.
Split View Routes
Some pages in the app use a split-view pattern that consists of a navigation menu on the left, and the main content in the right (in LTR interfaces). It is typically used to display a list of items in the menu, and display the contents of the selected item in the content. For example, showing a list of settings on the left with their content on the right.
This pattern is used in large screens (such as tablets), and logically is made up of two pages: one used for the menu and one for the content. The one with the menu defines an outlet for the content page, and in smaller devices (such as mobile phones), the outlet is hidden and navigating to items will override the entire page instead of populating the outlet. This is achieved by the styles and markup of the <core-split-view> component.
In order for the different behaviour to take place, routes are defined twice. Once where the content is a children of the menu, and again where the content is a sibling of the menu. These two definitions would clash in normal situations, but they are defined with a conditional that toggles them depending on the active breakpoint. You can find an example looking at the route definitions in the CoreSettingsLazyModule, which correspond with the routes that you can visit from the Main Menu > More > App Settings.
The navigation between these routes is often encapsulated within a CoreListItemsManager instance, that takes care of discerning the current active item and updating the route when selected items change. This manager will obtain the items from a CoreRoutedItemsManagerSource, which is necessary to enable swipe navigation.
Navigating between routes
In order to navigate between routes, you should use the CoreNavigator service. It works using Angular's router under the hood, and it takes care of all the routing specific to our application.
Most of the time, you'll probably want to use the navigateToSitePath method, because it will take into account the current main menu tab and navigate accordingly. If the call needs to navigate to another site, it'll also take care of all the login workflow.
If you are navigating to a specific route that is not affected by the current site nor the main menu tab, you can use the navigate method directly. This method can also be useful if you want to navigate relative to the current route, for example doing:
CoreNavigator.navigate('../');
Other than navigation, this service also contains some helpers that are not available in Angular out of the box. For example, the getRouteParam will get values from multiple sources such as query parameters or route parameters, and it also supports reading non-primitive values.
Make sure to check out the full api to learn more about the CoreNavigator service.
Navigating using swipe gestures
Most pages that use a split-view in tablets can be navigated using swipe gestures in mobile devices. The navigation is often encapsulated within a CoreSwipeNavigationItemsManager instance.
As mentioned in the split-view section, the items used by the manager are obtained from a CoreRoutedItemsManagerSource. This source will be reused between menu and content pages in mobile as well, so that swipe navigation respects any filters that have been applied in the menu page. In order to make sure that the same instance is reused, instead of creating a new one, these can be instantiated using the CoreRoutedItemsManagerSourcesTracker.getOrCreateSource() method. It will reuse instances that are still active, and when passed to managers the references will be cleared up when the managers are destroyed.
You can find an example of this pattern in CoreUserParticipantsPage, where participants can be filtered and the swipe navigation will respect the filtered results.
Singletons
The application relies heavily on the Singleton design pattern, and there are two types of singletons used throughout the application: Pure singletons and Service singletons.
Pure Singletons
Pure singletons, or just "singletons", are plain Typescript classes whose functionality does not depend on the lifecycle of the application. These normally contain helper or utility methods that enhance existing apis or encapsulate reusable functionality.
Their implementations usually consist of a collection of static methods (so technically they are not singletons, but in practice this is easier to work with).
export class CoreArray {

    static contains<T>(items: T[], item: T): boolean {
        return items.indexOf(item) !== -1;
    }

}
Service Singletons
Service singletons are instances resolved from the root application injector. In contrast with pure singletons, these are defined as Angular services. In particular, these should be singleton services.
The motivation behind using this pattern to access service instances is improving the development experience (easier auto-imports) and delaying the instantiation of services until they are really needed.
For example, service A may rely on service B in one method. Using Angular's dependency management you would declare service B in the constructor of service A. In this situation, service B would be instantiated whenever service A is instantiated, regardless of the method that uses it being called or not. Given the size of the codebase, this can have a cascading effect detrimental to the performance of the application. With the Service Singleton pattern, service B would only be instantiated when the method that uses it in service A is called.
To adopt this pattern, the only additional step in the service definition is to use the makeSingleton method (make sure to declare it as provided in root):
@Injectable({ providedIn: 'root' })
export class CoreUserService {

    // ...

}

export const CoreUser = makeSingleton(CoreUserService);
This method will create a proxy that will relay all the method calls to the service singleton instance. This proxy can be used like you would use an injected instance of the service. When any method is called, the underlying service will be initialised lazily. If you need to access the actual instance, you can do it via the instance property.
Since they are normal Angular services under the hood, they can be overridden in other modules. But keep in mind that because they are singletons, they will be replaced everywhere and not just in the module where they are being defined.
Here's one example of this overriding a core Angular service:
export class MyHttpClient extends HttpClient {}

export const Http = makeSingleton(HttpClient);

@NgModule({
    providers: [
        { provide: HttpClient, useClass: MyHttpClient },
    ],
})
export class MyModule {}
This pattern can be used mostly everywhere, because the underlying system is initialised before the app initialisation begins.
The exception to this rule is within service constructors, given that we don't have absolute control over when Angular will create service instances. For this same reason, code intended to run on application startup must be placed on an initializer. And anything else within a service should be initialised lazily, instead of using the constructor (a general good practice in programming is that constructors shouldn't have side-effects).
In the rare cases where a constructor really needs a dependency, it's always possible to fall back to Angular's built-in pattern of declaring dependencies in the constructor.
All the nomenclature can be a bit confusing, so let's do a recap:
- Singleton Service: An Angular service that will be instantiated at most once in the entire lifecycle of the application.
- Service Singleton: An instance of a Singleton Service.
- Singleton Proxy: An object that relays method calls to a Service Singleton instance.
Database
Most of the persistent data in the application is stored in SQLite databases. In particular, there is one database for global app configuration, and one for each site. Reading and writing data is encapsulated in the CoreDatabaseTable class. Each table can be configured to use one of the following caching strategies:
- Eager Caching: When the table is initialised, it will query all the records and store them in memory. This improves performance for data that is read very often, because reads will happen in-memory without touching the database. But it shouldn't be used for tables with a lot of records, to reduce memory consumption.
- Lazy Caching: Lazy caching works similar to eager caching, but instead of querying all the records upfront it'll remember records after reading them for the first time. This strategy is more appropriate for tables that are read often but have too many records to cache completely in memory.
- No Caching: Finally, for tables that are written more often than they are read, it is possible to disable caching altogether.
Something else important to note is that not all these tables are instantiated when the application is initialized, so for example even though a table may have Eager loading; it could be itself initialized lazily.
Schema migrations
Table schemas are declared using CoreAppSchema, CoreSiteSchema, and SQLiteDBTableSchema interfaces; and invoked using CoreApp.createTablesFromSchema() and CoreSitesProvider.applySiteSchemas(). In the case of site tables, these can be registered with the CORE_SITE_SCHEMAS injection token and they'll be invoked automatically when a new site is created.
In order to make some changes in existing schemas, it'll be necessary to change the version number and implement the migrate method to perform any operations necessary during the migration.
Legacy
Ideally, all interactions with the database would go through a CoreDatabaseTable instance. However, there is still some code using the previous approach through the SQLiteDB class. This should be avoided for new code, and eventually migrated to use the new approach to take advantage of caching.
Application Lifecycle
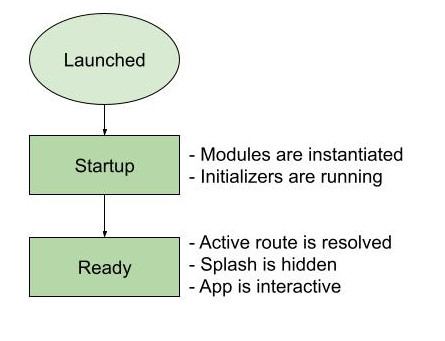
When the application is launched, the contents of index.html are rendered on screen. This file is intentionally concise because all the flare is added by JavaScript, and the splash screen will be covering the application UI until it has fully started. If you are developing in the browser, this will be a blank screen for you given that the splash screen is not available on the web. We are not targeting browsers in production, so it's acceptable to have this behaviour during development.
Before the UI is rendered, the startup process will take place. First, Angular will instantiate AppModule and all the imported modules (features, addons, etc.), and then it will execute the initializers (this includes all the initializers, not only the ones declared under core/initializers/). In our application, we have overridden Angular's initialisation service to get a hold of the root injector so that we can safely use the Service Singletons pattern within initializers. However, we should avoid this pattern within constructors, because those can be called during the instantiation phase.
Once the application has finished starting up, the router will resolve the active route and the corresponding page component will be rendered. At this point, the splash screen will be hidden and the app is interactive.
Testing
There are two types of tests in the mobile app.
Unit
Unit tests are written in JavaScript using jest. If you want to create a new one, jest is already configured and you only need to create a file ending with .test.ts within the project. If you're going to do so, remember to follow the file location conventions.
You can run the entire test suite using the npm test command. If you are using VSCode, you can also use the debugger to run preconfigured test tasks in the current file or the entire project (using F5 with the default keybindings). This will allow you to use breakpoints and other advanced debugging tools.
You can write standard jest tests for the most part, but something to keep in mind is that the codebase relies heavily on Service Singletons. So you will need to mock any instances that are used in the code you're testing.
You can learn more about this in the Unit testing for the Moodle App page.
Acceptance
Acceptance tests are written in Gherkin using Behat. These are run against the full application with a real Moodle site, so they are more heavy-handed and will take longer to run. But they are also much more realistic than unit tests.
If you are using moodle-docker, you can configure it to run the tests from your local copy of the application. Keep in mind that doing this will run the app on a docker image, and expose the dev server to your machine. So you shouldn't be running npm start or any other commands launching a dev server while docker is running, or you'll have two instances running and that can cause some problems.
In order to run your Behat tests, they need to be installed in the Moodle site. You can automate this process by running the npx gulp behat command in the app folder, which will create a local plugin containing your application tests. This uses the environment variables from moodle-docker, if you're not using it you can also configure this by setting the MOODLE_APP_BEHAT_PLUGIN_PATH variable. If you want to keep them up to date every time you change the test files, you can run npx gulp watch-behat (this is already done when developing locally, but if you're serving the app with moodle-docker you'll need to run this from your local machine).
You can write standard Behat tests for the most part, but there are some steps specific for the Moodle App that you should use instead of the ones for the Moodle LMS.
You can learn more about this in the Acceptance testing for the Moodle App page.